Vizion'R HbbTV Inserter works virtually on any platform supporting a Java Virtual Machine.
Install Java JRE or Java JDK 7
If not installed, please install JDK (Java Development Toolkit, version 7) or JRE 7 (Java Runtime, version 7).
WARNING: if you are using a Windows 64 bits OS, be sure to install a 64 bits JVM, otherwise output to Dektec cards won't work (but all other features will).
You can download it from here:
http://www.oracle.com/technetwork/java/javase/downloads/index.html.
Install Apache Tomcat 7
You can download it from here:
http://tomcat.apache.org/download-70.cgi. The best is to select the version called "32-bit/64-bit Windows Service Installer".
You can use all default options to install it.
Install the Dektec Drivers (Optional)
Download the Dektec Drivers from here:
http://www.dektec.com/Downloads/DriversSDKs.asp and install it as Administrator (warning for USB Drivers, unplug the Card before installing it).
WARNING: If you have existing drivers for your Dektec Card, be sure to install the latest ones from the Dektec web site.
Update Tomcat Policy
We now suppose you have installed Tomcat 7 in directory
C:\Program Files\Apache Software Foundation\Tomcat 7.0\.
Edit the file
C:\Program Files\Apache Software Foundation\Tomcat 7.0\conf\catalina.policy and add into this file the following lines:
grant {

        permission java.io.FilePermission "c:/.vizionr/hbbtv/-" "read,write,delete";

};
Install the application into tomcat
Rename the war provided by Vizion'R into file "hbbtv.war", then, copy it in the directory
C:\Program Files\Apache Software Foundation\Tomcat 7.0\webapps\.
You can now
Test the application.
Installing on a recent Ubuntu should take around 10 minutes.
Install Oracle Java 7
sudo add-apt-repository ppa:webupd8team/java

sudo apt-get update

sudo apt-get install oracle-java7-installer
Install Tomcat
sudo apt-get install tomcat7
Change Tomcat Settings
Edit /etc/default/tomcat7 and add the line :
JAVA_HOME=/usr/lib/jvm/java-7-oracle/
Create a file
/etc/tomcat7/policy.d/05vizionr.policy and put the following text:
grant {

	permission java.io.FilePermission "/usr/share/tomcat7/.vizionr/-" "read,write,delete";

        permission java.io.FilePermission "/usr/share/tomcat7/.vizionr/hbbtv/-" "read,write,delete";

	permission java.io.FilePermission "/usr/share/tomcat7/.vizionr/dektec/-" "read,write,delete";

};
Create the directory /usr/share/tomcat7/.vizionr/hbbtv/ (Inserter's inner data):
sudo mkdir -p /usr/share/tomcat7/.vizionr/hbbtv/

sudo chown tomcat7 /usr/share/tomcat7/.vizionr/hbbtv/

sudo chmod u+rwx /usr/share/tomcat7/.vizionr/hbbtv/
And create the directory /usr/share/tomcat7/hbbtv/ (for HbbTV data injection):
sudo mkdir -p /usr/share/tomcat7/hbbtv

sudo chown tomcat7 /usr/share/tomcat7/hbbtv/

sudo chmod u+rwx /usr/share/tomcat7/hbbtv/
Adapting UDP Settings to work with huge UDP Streams
Since HbbTV Inserter will work with huge amount of UDP datagrams, it is better to customize Linux settings to avoid loosing UDP packets.
To change these settings, edit the file
/etc/sysctl.conf and add those two lines:
net.core.rmem_max=3145728

net.core.wmem_max=52428
Once the file modified, reboot. With these settings, even on slow computer, you probably won't loose UDP packets.
Install Dektec Drivers (Optional)
Download the Drivers for Linux here:
http://www.dektec.com/Products/SDK/LinuxSDK/Downloads/LinuxSDK.tar.gz.
We provide a script here that performs all the necessary steps to install the Dektec Drivers for your kernel:
install_dkms.sh.
Save this script in the directory of LinuxSDK and launch it as root:
sudo sh install_dkms.sh
Install Vizion'R HbbTV Inserter application
Copy the war file into directory
/var/lib/tomcat7/webapps/ with the following command (be sure to replace VERSION with the version you have):
sudo cp vizionr-hbbtv-VERSION-bin.war /var/lib/tomcat7/webapps/hbbtv.war
.
Restart tomcat:
sudo /etc/init.d/tomcat7 restart.
Test the application

The application should now be accessible at
http://localhost:8080/hbbtv/.
You can now login with
user: admin and
password: admin.
DO NOT FORGET TO CHANGE the password once loggued.
Sending a Test Stream to the application
Using a TS file
If you don't have a running Stream, use our tool
TSRestreamer.jar.
To use it:
java -jar TSRestreamer.jar 24882000 NTN.ts 127.0.0.1 10001 (24882000 is the bitrate in bps of the TS file you would like to stream, 127.0.0.1 the address of the HbbTV Inserter and 10001 would be the port of the UDP input in the inserter,
NTN.ts can be downloaded from our website for testing purposes).
To know the bitrate for given modulation, you can have a look to this table:
http://www.szeluhua.com/upload/2010413223427664.pdf.
Using live content from a live DVB stream
If you want to test live, you can directly use tools to broadcast streams to UDP.
For this purpose, you can either use professional cards (Dektec for instance) or even budget cards!
Linux
With Linux for instance, use a Linux-supported
DVB device (example: Terratec Cinergy TStick - around 20€) and use the following command:
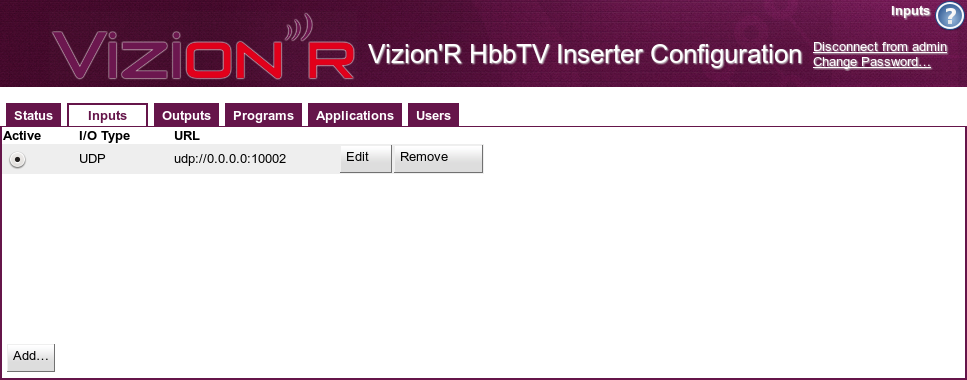
dvbstream -f 506000 8192 -o - | nc -u 127.0.0.1 10002
Where 506000 is the frequency of
DVB multiplex and 10002 is the Input port configured in our inserter.
With Windows
Download the tool called
DVPiper and Unzip it.
Before starting DVPiper for the first time, you have to register a DLL. It can be done this way: Use the start Menu, find the command prompt into accessories and right click on it "Execute as Administrator". Type "cd " and Drag and drop the directory where DVPiper has been downloaded, then type Enter. The command prompt should be in the DVPiper directory. Simply type "install.bat" and then type ENTER. DVPiper is now ready to work.
Redirecting the output of your DVB Card to the inserter can now be done with the following command (in the command prompt):
DVPiper.exe -type DVB-T -frequency 586000 -symbolrate 27500 -bandwidth 8 -command "record(rid(123),send(udp(127.0.0.1,1234)))"
Where 586000 is the frequency in kHz, 127.0.0.1 is the address of the HbbTV inserter and 1234 is the UDP port the inserter is listening to.